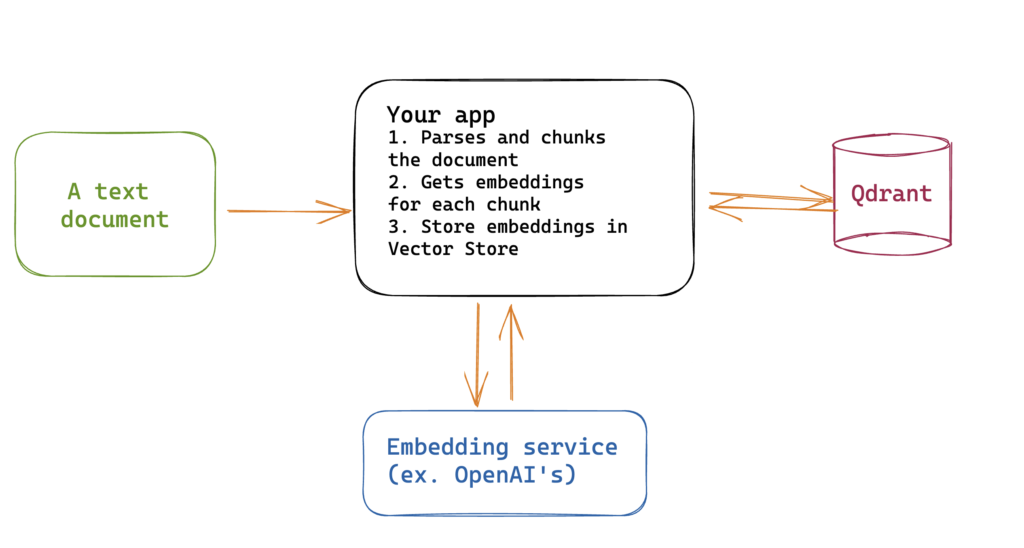
Qdrant is a database that allows doing sematinc search on your content by allowing you to do vector similarity search.
That means you can take your embeddings —or vectors, they are practically the same thing— from OpenAI’s embedding service, store them in Qdrant, and then perform queries against them.
You can use this to add retrieve context for a query before making a request to ChatGPT’s completion service.
Now this blogpost is about just hitting Qdrant from Node.js, but if you ping me via twitter I may add the other steps.
Creating your own QdrantClient
The problem with using Qdrant is that doesn’t have a javascript client.
BUT! They have an OpenApi specification. So you can generate your own client.
Let’s do it!
We will be using https://openapi-generator.tech/docs/installation/
Step 1: Installing the CLI tool
npm install @openapitools/openapi-generator-cli -g
Easy enough!
Step 2: Copy the following file into your system:
https://github.com/qdrant/qdrant/blob/master/docs/redoc/master/openapi.json
Step 3: Run the cli tool
For this you can generate a client for any language that you choose.
I like the typescript-axios generator
So I run
openapi-generator-cli generate -g typescript-axios -o out -i /<YOUR_PATH_TO>/openapi.json
Great! Now we have a fully functioning client!
Step 4: Actually use the code
We can now import from the client and start using it!
There’s a gotcha though. VERY IMPORTANT. The apiKey key when instantiating a new config doesn’t work. I don’t know why, but it doesn’t send the headers. So we gotta lift the hood and pass the header manually.
const config = new Configuration({
  baseOptions: {
    headers: {
      "api-key": "YOUR QDRANT CLOUD API KEY",
    },
  },
  basePath:
    "https://Your db url.us-east-1-0.aws.cloud.qdrant.io:6333",
});

export const pointsApi = new PointsApi(config);
export const collectionsApi = new CollectionsApi(config);
Ta Da! Now you can actually start using it!
Step 5: Creating a collection
You gotta create a collection now. You’ll need to pass a size that all vectors will have (psst, use OpenAI’s embeddings size of 1536) and a way of measuring distance between the vectors
collectionsApi.createCollection('MyNewCollectionName', undefined,{
  vectors: {
    distance: "Cosine",
    size: 1536
  }
})
Step 6: Actually using the collection
You can now add, remove, update elements from the collection. Note that Qdrant calls this elements “points”.
You can also attach a payload to these elements so you can also filter them or store info inside each point.
The following is an example of storing a point
await pointsApi.upsertPoints(COLLECTION_NAME, undefined, undefined, {
            points: [
              {
                id: randomUUID(),
                vector: embeddingResponse.data[0]?.embedding, // This is the response format from OpenAI's service
                payload: {
                  writeHere: "whatever you want or need"
                },
              },
            ],
          });
And that’s it!
Hope you liked it!
Best
Mike